- Access exclusive content
- Connect with peers
- Share your expertise
- Find support resources
Click Preferences to customize your cookie settings.
Unlock your full community experience!
入门指南:数据包捕获
- Subscribe to RSS Feed
- Mark as New
- Mark as Read
- Printer Friendly Page
症状
让我为你解决这个问题。数据包捕获-
管理员在完成安全策略的杰作后几分钟遇到的一个典型情况是:为什么自从安装了新的网络设备后,一些不起眼的应用程序表现得很奇怪。这就是故障排除的开始。
在过去几期中,我们检查了several aspects of how to configure your firewall 并从头开始设置它。
管理员可以使用的更高级的工具之一是执行数据包捕获和查看会话计数器的能力。
注意:文章中讨论的一些细节将导致性能影响。如果你不确定,请与Palo Alto支持个人合作,在维护窗口捕获数据包。
环境
- 任何PAN-OS
- Palo Alto 防火墙
解决办法
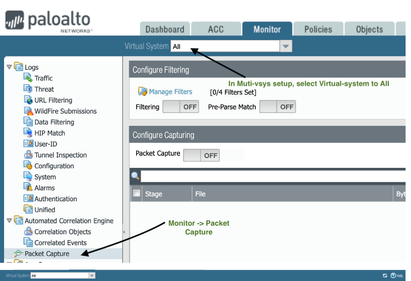
第一个要去的地方是GUI上的Packet Capture菜单,在那里你可以管理过滤条件,添加要捕获的阶段,并轻松下载捕获。


在我们开始之前,有几件事情你应该知道:
- 可以添加四个具有各种属性的过滤条件。
- 数据包捕获是基于会话的,所以一个过滤条件能够捕获client2server和server2client。
- 数据包是在数据平面上与接口上捕获的(这解释了下一个子弹)。
- Pre-Parse Match是一个功能,可以在数据平面上运行的引擎处理之前捕获所有文件,这可以帮助排除引擎可能没有正确接受入站数据包的问题。这个选项只有在支持部门的指示下才能使用,而且要在一天中的低流量时间使用,因为它将捕获所有的东西。
- 当过滤被启用时,新的会话被标记为过滤,可以被捕获,但现有的会话没有被过滤,可能需要重新启动才能捕获它们。
- 卸载的会话不能被捕获,所以卸载可能需要暂时禁用。卸载的会话将在显示会话细节中显示 "layer7 processing: completed"。注意,由于匹配的数据包由CPU处理,这可能会导致性能影响。在维护窗口中运行这个程序,如果需要的话,请向支持部门寻求帮助。
要记住的东西很多,但在你试着对各种协议的数据包进行捕捉后,一切都会变得有意义,我保证!
让我们添加几个过滤条件:

过滤条件2和4是我的 "备份 "过滤条件。我在前面提到,数据包捕获是可以感知的,但是,万一返回的数据包在上游发生了什么,导致它不能与我的NAT规则相匹配(也许上游设备弄乱了源端口或对序列号做了什么奇怪的事情),我通常会设置一个返回规则来捕捉任何由于不匹配而被丢弃的杂散数据。
注意:确保过滤条件尽可能的精确。不要运行与整个子网相匹配的过滤条件,如192.168.0.0/16或0.0.0.0/0,因为这可能导致性能影响和中断。
如果我们现在把 "过滤 "按钮切换到 "打开",过滤条件将被应用于任何符合标准的新会话。

检查过滤条件是否工作的一个简单方法是,如果启动一个新的会话,检查全局计数器是否在增加。
在CLI中,我执行这个命令:
> show counter global filter delta yes packet-filter yes
Global counters:
Elapsed time since last sampling: 2.647 seconds
--------------------------------------------------------------------------------
Total counters shown: 0
--------------------------------------------------------------------------------
而且没有显示任何计数器。
- 'delta yes'表示我想查看自我上次执行此命令后增加的计数器。
- 'packet-filter yes'表示我只想看到符合我的过滤器的全局计数器。
如果我现在刷新我的浏览器并再次执行该命令:
> show counter global filter packet-filter yes delta yes
Global counters:
Elapsed time since last sampling: 2.630 seconds
name value rate severity category aspect description
--------------------------------------------------------------------------------
pkt_sent 22 8 info packet pktproc Packets transmitted
pkt_outstanding 22 8 info packet pktproc Outstanding packet to be transmitted
session_allocated 4 1 info session resource Sessions allocated
session_installed 4 1 info session resource Sessions installed
appid_proc 2 0 info appid pktproc The number of packets processed by Application identification
appid_use_dfa_1 2 0 info appid pktproc The number of packets using the second DFA table
nat_dynamic_port_xlat 4 1 info nat resource The total number of dynamic_ip_port NAT translate called
dfa_sw 8 3 info dfa pktproc The total number of dfa match using software
ctd_sml_opcode_set_file_type 1 0 info ctd pktproc sml opcode set file type
aho_sw 5 1 info aho pktproc The total usage of software for AHO
ctd_pkt_slowpath 4 1 info ctd pktproc Packets processed by slowpath
--------------------------------------------------------------------------------
Total counters shown: 11
--------------------------------------------------------------------------------
你会看到有一堆的计数器。我在本文底部添加了一个链接,以获得更多关于全局计数器的信息,我们将在未来的一集中更多地介绍它们。但现在,只要有计数器,我们就应该可以了。
接下来你要配置阶段--有4个:
- 丢弃阶段是数据包被丢弃的地方。原因可能各不相同,对于这一部分,全局计数器可能有助于确定丢弃是由于政策拒绝、检测到的威胁还是其他原因。
- 接收阶段在数据包进入防火墙引擎之前捕捉它们进入防火墙的情况。当配置了NAT时,这些数据包将是预NAT。
- 传输阶段捕捉数据包如何从防火墙引擎中输出。如果配置了NAT,这些将是后NAT。
- 防火墙阶段捕获防火墙阶段的数据包。
对于每个阶段,你可以为输出文件指定一个名称,并设置一个最大的数据包或字节数。


当所有需要的阶段都设置好后,你可以把捕获按钮切换到ON,或者你可以使用CLI,清除符合指定过滤条件的现有会话。这是为了确保在过滤条件启用之前没有任何会话被激活。然后使用capture on命令,开始捕获,如下图所示。
> show session all =>记下符合配置的过滤条件的会话号码。
> clear session id <id#> => 这是为了清除任何符合配置的过滤条件的现有会话。.
Example:
> show session all
--------------------------------------------------------------------------------
ID Application State Type Flag Src[Sport]/Zone/Proto (translated IP[Port])
Vsys Dst[Dport]/Zone (translated IP[Port])
--------------------------------------------------------------------------------
27240 web-browsing ACTIVE FLOW NS 192.168.0.34[61003]/trust/6 (198.51.100.230[31047])
vsys1 198.51.100.97[80]/ISP1 (198.51.100.97[80])
....(output omitted)....
> clear session id 27240session 27240 cleared
> debug dataplane packet-diag set capture on
Packet capture is enabled
你现在可以启动你想捕捉的会话。要验证会话是否已经开始,使用show session命令。
> show session all
--------------------------------------------------------------------------------
ID Application State Type Flag Src[Sport]/Zone/Proto (translated IP[Port])
Vsys Dst[Dport]/Zone (translated IP[Port])
--------------------------------------------------------------------------------
32637 web-browsing ACTIVE FLOW NS 192.168.0.34[61903]/trust/6 (198.51.100.230[31547])
vsys1 198.51.100.97[80]/ISP1 (198.51.100.97[80])
32635 ssh ACTIVE FLOW NS 192.168.0.34[61901]/trust/6 (198.51.100.230[52812])
vsys1 198.51.100.1[22]/ISP1 (198.51.100.1[22])
当你完成后,可以通过将按钮拨回到OFF位置或使用调试命令来关闭捕获。
> debug dataplane packet-diag set capture off
Packet capture is disabled
> debug dataplane packet-diag clear filter-marked-session all
Unmark All sessions in packet debug
注意:不要忘记在调试后关闭数据包捕获。如果不这样做,可能会对CPU造成负担,并可能导致性能问题。
现在将有捕获的文件可供下载,你可以用Wireshark进行分析。

在你下载pcaps后,你可能需要将发送和接收文件合并在一起:
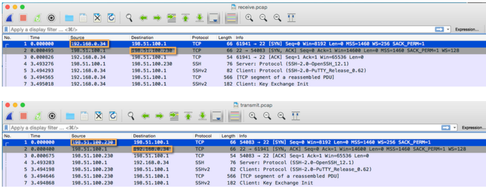
- 接收阶段将有客户的私有IP到网络服务器的公共IP,以及从网络服务器公共IP返回的数据包到防火墙的外部IP(接收阶段是预NAT)。
- 发送阶段将有防火墙外部IP(客户端NAT)到服务器公共IP,以及返回的公共IP到客户端私有IP。
当你试图跟踪TCP流时,这可能有点令人困惑,你要注意这两个文件之间的重要区别。

这两个阶段将确保你能够验证NAT是否被正确应用。你还可以看到从客户和服务器的角度来看,发出和收到的数据包是否有任何不同。
合并后的结果应该是这样的,并允许你逐一比较正在发送的数据包和正在接收的数据包。

有几篇有用的文章可以帮助你更好地了解数据包如何在系统中流动:
What is the Significance of Global Counters?
Packet Flow Sequence in PAN-OS
Management plane
要排除管理平面的连接问题,可以使用内置的tcpdump命令来捕获有用的信息。
admin@myNGFW> tcpdump filter "port 53"
Press Ctrl-C to stop capturing
tcpdump: listening on eth0, link-type EN10MB (Ethernet), capture size 96 bytes
^C
16 packets captured
32 packets received by filter
0 packets dropped by kernel
The resulting output is stored in a mgmt.pcap file on the management plane:
admin@myNGFW> view-pcap mgmt-pcap mgmt.pcap
15:24:07.512889 IP 10.0.0.1.36606 > 10.0.0.98.domain: 49243+ PTR? 0.0.0.10.in-addr.arpa. (41)
15:24:07.513106 IP 10.0.0.98.domain > 10.0.0.1.36606: 49243 NXDomain 0/1/0 (100)
15:24:17.196515 IP 10.0.0.1.45455 > 10.0.0.98.domain: 3126+ PTR? 0.0.0.10.in-addr.arpa. (41)
15:24:17.196762 IP 10.0.0.98.domain > 10.0.0.1.45455: 3126 NXDomain 0/1/0 (100)
15:24:31.126186 IP 10.0.0.1.57230 > 10.0.0.98.domain: 2978+ A? panos.wildfire.paloaltonetworks.com. (53)
15:24:31.126196 IP 10.0.0.1.57230 > 10.0.0.98.domain: 55173+ AAAA? panos.wildfire.paloaltonetworks.com. (53)
15:24:31.161436 IP 10.0.0.98.domain > 10.0.0.1.57230: 2978 4/0/0[|domain]
15:24:31.194586 IP 10.0.0.98.domain > 10.0.0.1.57230: 55173 2/0/0[|domain]
15:25:56.746679 IP 10.0.0.1.46048 > 10.0.0.98.domain: 43532+ A? wildfire.paloaltonetworks.com. (47)
15:25:56.746689 IP 10.0.0.1.46048 > 10.0.0.98.domain: 16653+ AAAA? wildfire.paloaltonetworks.com. (47)
15:25:56.794940 IP 10.0.0.98.domain > 10.0.0.1.46048: 43532 1/0/0 (63)
15:25:56.795553 IP 10.0.0.98.domain > 10.0.0.1.46048: 16653 0/1/0 (131)
15:25:59.038459 IP 10.0.0.1.51804 > 10.0.0.98.domain: 23806+ A? panos.wildfire.paloaltonetworks.com. (53)
15:25:59.038471 IP 10.0.0.1.51804 > 10.0.0.98.domain: 31471+ AAAA? panos.wildfire.paloaltonetworks.com. (53)
15:25:59.071431 IP 10.0.0.98.domain > 10.0.0.1.51804: 23806 4/0/0[|domain]
15:25:59.113552 IP 10.0.0.98.domain > 10.0.0.1.51804: 31471 2/0/0[|domain]
请查看这篇文章以了解更多信息 How To Packet Capture (tcpdump) On Management Interface
其他信息
- 为了控制数据包捕获文件的大小,单个文件被限制在 200mb,一旦超过这个大小,就会自动创建第二个文件,然后这两个文件将作为一个环形缓冲区,主 pcap 文件被用来写入活动的捕获数据,*.cap.1 文件被用来作为缓冲区。一旦主 pcap 再次达到其容量,缓冲文件将被丢弃,主文件被重命名为 *.pcap.1,并启动一个新的主文件。更多信息在这里:What is The Limitation of the Packet Capture File Size on PAN-OS?
- 对于小的捕捉,把所有的东西都捕捉到一个文件中可能会很方便,所以有可能让每个阶段都捕捉到同一个文件名。请注意上述的大小限制,以及每个阶段的可见度降低。推荐的方法是每个阶段都有一个单独的文件。
从PAN-OS 8.1.0开始,可以为源网和网络子网添加过滤条件,这只能通过CLI而不是WebGUI获得。
admin@firewall> debug dataplane packet-diag set filter match
+ destination Destination IP address
+ destination-netmask Destination netmask <<<< new option for network
+ destination-port Destination port
+ ingress-interface Ingress traffic interface name
+ ipv6-only IPv6 packet only
+ lacp LACP packet
+ non-ip Non-IP packet
+ protocol IP protocol value
+ source Source IP address
+ source-netmask Source netmask <<<< new option for network
+ source-port Source port
| Pipe through a command
<Enter> Finish input
admin@firewall> debug dataplane packet-diag set filter match source 192.168.1.0 source-netmask 24
admin@firewall> debug dataplane packet-diag set filter match destination 192.168.2.0 destination-netmask 24
admin@firewall> debug dataplane packet-diag show setting
DP dp0:
--------------------------------------------------------------------------------
Packet diagnosis setting:
--------------------------------------------------------------------------------
Packet filter
Enabled: no
Match pre-parsed packet: no
Index 1: 192.168.1.0/24[0]->0.0.0.0/0[0], proto 0 <<<<<<<<< network is captured /24
ingress-interface any, egress-interface any, exclude non-IP
Index 2: 0.0.0.0/0[0]->192.168.2.0/24[0], proto 0 <<<<<<<<< network is captured /24
ingress-interface any, egress-interface any, exclude non-IP
--------------------------------------------------------------------------------
注意:启用全网捕获时要谨慎,可能会有大量的数据包,导致数据平面CPU的高消耗和可能的流量影响。
附件
- 1041 Views
- 0 comments
- 0 Likes


