- Access exclusive content
- Connect with peers
- Share your expertise
- Find support resources
Click Preferences to customize your cookie settings.
Unlock your full community experience!
Creating VLAN's,.
- LIVEcommunity
- Discussions
- General Topics
- Re: Creating VLAN's,.
- Subscribe to RSS Feed
- Mark Topic as New
- Mark Topic as Read
- Float this Topic for Current User
- Printer Friendly Page
Creating VLAN's,.
- Mark as New
- Subscribe to RSS Feed
- Permalink
08-28-2013 05:01 AM
Hi All,.
How to create VLAN's in PaloAlto?
Created VLAN interface 1 (ip 10.10.10.1/24) and created the vlan "sales" for this VLAN interface.(configured zone, applied to default router)
Created VLAN interface 2 (ip 10.10.20.1/24) and created the vlan "Accounts" for this VLAN interface.(configured zone, applied to default router)
For above scenario which physical interface needs to connected to layer 2 switch and how to define that port as a trunk? what are the setting needs to be done for that physical interface?
I am totally confused,..kindly help me to understand this concept.
Regards,
Gururaj
- Mark as New
- Subscribe to RSS Feed
- Permalink
08-28-2013 05:48 AM
You should not use vlan objects, you can go ahead and delete those. Select the physical interface on which the trunk is connected and create L3 subinterfaces on it. Put them in the default router, assign a VLAN ID, put them in a zone and create a policy.
- Mark as New
- Subscribe to RSS Feed
- Permalink
08-28-2013 05:49 AM
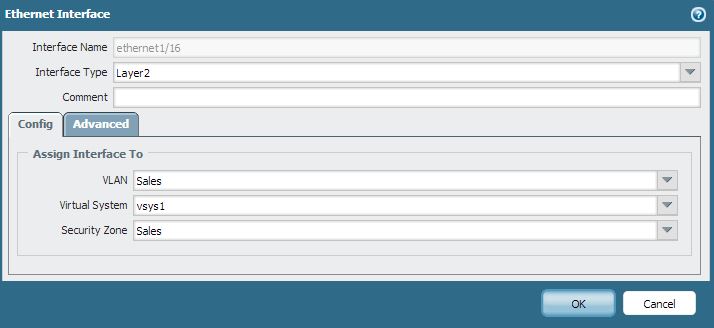
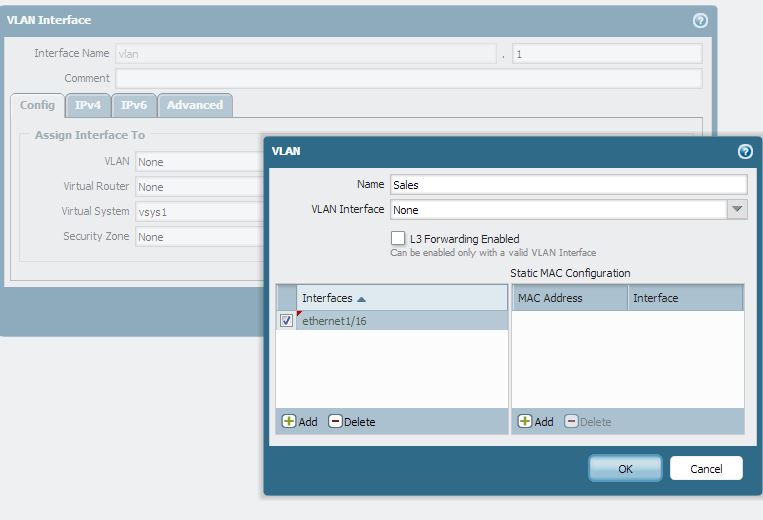
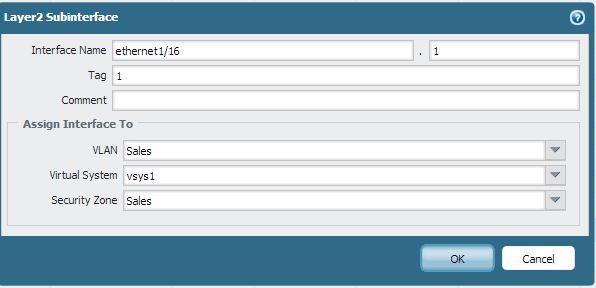
You have to first configure an interface or a sub interface as a layer 2 type

Then use this interface/ sub interface under the Vlan that you have configured.

When you configure multiple sub interfaces under the physical interface, it automatically becomes a trunk port, like shown below. Ensure that when connecting to a switch, the switch ports should be configured with the same vlans that have been configured on the sub interfaces on the PAN


- Mark as New
- Subscribe to RSS Feed
- Permalink
08-29-2013 09:58 AM
Hi Gunraj,
Following doc explains how you can create VLAN's.
https://live.paloaltonetworks.com/docs/DOC-2011
The doc has different scenrio's explains in it.
Please let us know if this helps.
Thanks
Numan
- Mark as New
- Subscribe to RSS Feed
- Permalink
06-21-2014 08:15 AM
No, this doc doesnt have requested information. VLAN tags translation is done on single L2 interface with L2 subinterfaces put into different VLANS as kprakash desribed above. Also I have question if we need to have security policy or put interface to single Security Zone?
- 6866 Views
- 5 replies
- 0 Likes
Show your appreciation!
Click Accept as Solution to acknowledge that the answer to your question has been provided.
The button appears next to the replies on topics you’ve started. The member who gave the solution and all future visitors to this topic will appreciate it!
These simple actions take just seconds of your time, but go a long way in showing appreciation for community members and the LIVEcommunity as a whole!
The LIVEcommunity thanks you for your participation!
- I have concern in SDWAN, Kindly help out this. in Advanced SD-WAN for NGFW Discussions
- Create Tech Support File from Strata Cloud Manager in Strata Cloud Manager
- XSIAM Dashboard in Cortex XSIAM Discussions
- GRPC status UNAVAILABLE in intelligent offload in VM-Series in the Private Cloud
- Limitations Observed with XQL Custom Widgets and Issue Visibility in Cortex XDR Discussions


