- Access exclusive content
- Connect with peers
- Share your expertise
- Find support resources
Click Preferences to customize your cookie settings.
Unlock your full community experience!
Object Names and IP Addresses
- LIVEcommunity
- Discussions
- General Topics
- Object Names and IP Addresses
- Subscribe to RSS Feed
- Mark Topic as New
- Mark Topic as Read
- Float this Topic for Current User
- Printer Friendly Page
Object Names and IP Addresses
- Mark as New
- Subscribe to RSS Feed
- Permalink
06-02-2015 01:40 PM
I've run across an interesting "feature" in working with the Palo Alto system. I'm converting from the Checkpoint platform and have found a feature that I use in the Checkpoint all the time, but don't have available in the Palo Alto Panorama. If you type the IP address of an object, but that address is not part of the name, you won't be able to select it from the drop down list.
Example:
I'm trying to add an object to the source address field by typing it's IP address:
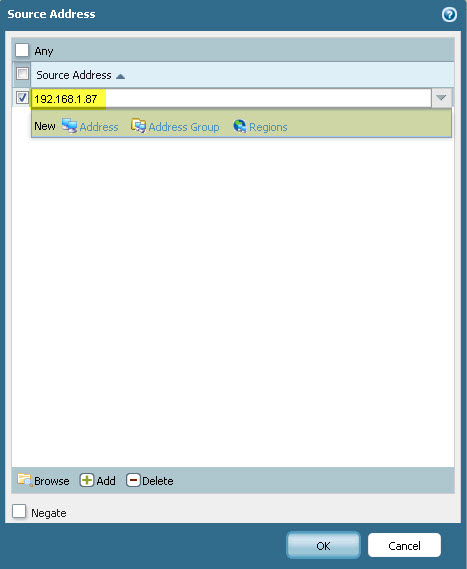
No objects show up in the selection box. The selection box appears to be name only.
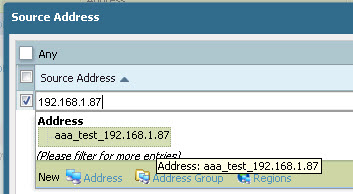
Adding the IP address into the name of the object allows me to be able to select it from this box by typing the IP address (or any portion of the address).
Are there plans to add this feature to the product or are there other ways to work around this minor inconvenience?
- Labels:
-
Panorama
- Mark as New
- Subscribe to RSS Feed
- Permalink
06-02-2015 05:33 PM
Welcome to Palo Alto.
You won't be able to get answers to future release questions here. Palo Alto is very strict about not mentioning road map or future features in public forums. You have to get this from your assigned sales engineer.
Palo Alto maintains a database called the Feature Request and each feature is assigned a number FR123. Your sales engineer will search the database to see if the feature is already requested and your company can add their "vote" for the feature into the database. The sales engineer can generally find out if a feature is on the near term release cycle for you (PanOS 7 right now).
ACE PanOS 6; ACE PanOS 7; ASE 3.0; PSE 7.0 Foundations & Associate in Platform; Cyber Security; Data Center
- Mark as New
- Subscribe to RSS Feed
- Permalink
06-03-2015 10:46 AM
Thanks for the heads up Steven on the feature requests.
Here is a procedure that you can use to perform a mass object rename. I used this procedure to rename about 2000 objects in the firewall to append the IP address to the end of the object name. My example shows how to rename 5 Citrix Server objects. I'm a long time Cisco guy, so I really like the SET commands.
#Change to use the SET format of output on the configuration:
set cli config-output-format set
#Move into Config Mode:
config show
#show the configuration and show all address objects:
show | match address
#=============================================================
#Original Objects:
#=============================================================
set device-group "Internet Firewall" address CitrixServer01 ip-netmask 10.0.0.1/32
set device-group "Internet Firewall" address CitrixServer01 description "Citrix Server"
set device-group "Internet Firewall" address CitrixServer02 ip-netmask 10.0.0.2/32
set device-group "Internet Firewall" address CitrixServer02 description "Citrix Server"
set device-group "Internet Firewall" address CitrixServer03 ip-netmask 10.0.0.3/32
set device-group "Internet Firewall" address CitrixServer03 description "Citrix Server"
set device-group "Internet Firewall" address CitrixServer04 ip-netmask 10.0.0.4/32
set device-group "Internet Firewall" address CitrixServer04 description "Citrix Server"
set device-group "Internet Firewall" address CitrixServer05 ip-netmask 10.0.0.5/32
set device-group "Internet Firewall" address CitrixServer05 description "Citrix Server"
#=============================================================
#Save the output for all of your address objects to a text file called "C:\Temp\Objects.txt"
#Open a command-prompt window and filter to only show lines with the text "ip-netmask"
more c:\temp\objects.txt | find /i "ip-netmask" > c:\temp\objects-addr.txt
#Open the new text file into Notepad++. This is what your file will look like:
#=============================================================
set device-group "Internet Firewall" address CitrixServer01 ip-netmask 10.0.0.1/32
set device-group "Internet Firewall" address CitrixServer02 ip-netmask 10.0.0.2/32
set device-group "Internet Firewall" address CitrixServer03 ip-netmask 10.0.0.3/32
set device-group "Internet Firewall" address CitrixServer04 ip-netmask 10.0.0.4/32
set device-group "Internet Firewall" address CitrixServer05 ip-netmask 10.0.0.5/32
#=============================================================
#Within Notepad++ perform the following find and replace:
Find what: ip-netmask .*
Replace with:
Search Mode: Regular expression
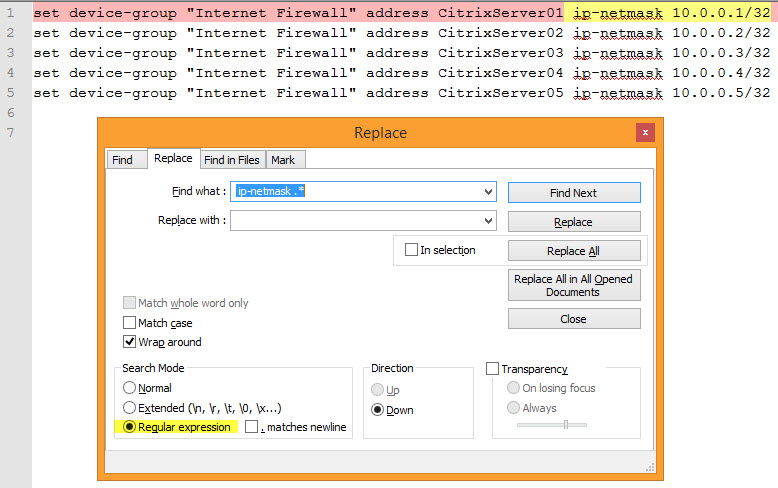
#This will replace the end of each line and leave you with a list of server names. The file will now look like this:
#=============================================================
set device-group "Internet Firewall" address CitrixServer01
set device-group "Internet Firewall" address CitrixServer02
set device-group "Internet Firewall" address CitrixServer03
set device-group "Internet Firewall" address CitrixServer04
set device-group "Internet Firewall" address CitrixServer05
#=============================================================
#Open Microsoft Excel and Paste the file contents into cell A1.
#Switch back to Notepad++ and re-open your c:\temp\objects-addr.txt file:
#=============================================================
set device-group "Internet Firewall" address CitrixServer01 ip-netmask 10.0.0.1/32
set device-group "Internet Firewall" address CitrixServer02 ip-netmask 10.0.0.2/32
set device-group "Internet Firewall" address CitrixServer03 ip-netmask 10.0.0.3/32
set device-group "Internet Firewall" address CitrixServer04 ip-netmask 10.0.0.4/32
set device-group "Internet Firewall" address CitrixServer05 ip-netmask 10.0.0.5/32
#=============================================================
#Perform the following find and replace in Notepad++:
Find what: set device-group "Internet Firewall" address
Replace with:
Search Mode: Normal
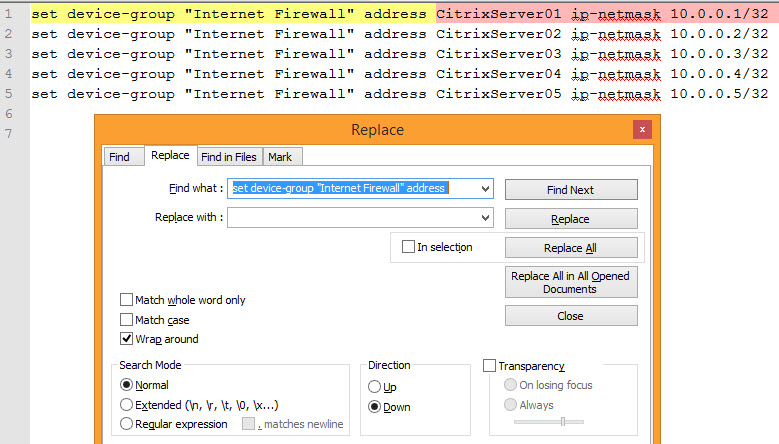
#Your file will now look like this:
#=============================================================
CitrixServer01 ip-netmask 10.0.0.1/32
CitrixServer02 ip-netmask 10.0.0.2/32
CitrixServer03 ip-netmask 10.0.0.3/32
CitrixServer04 ip-netmask 10.0.0.4/32
CitrixServer05 ip-netmask 10.0.0.5/32
#=============================================================
...[procedure continuing in the next post]...
- Mark as New
- Subscribe to RSS Feed
- Permalink
06-03-2015 10:54 AM
#Now perform the following Find and Replace action in Notepad++:
Find what: ip-netmask
Replace with: _
Search Mode: Normal
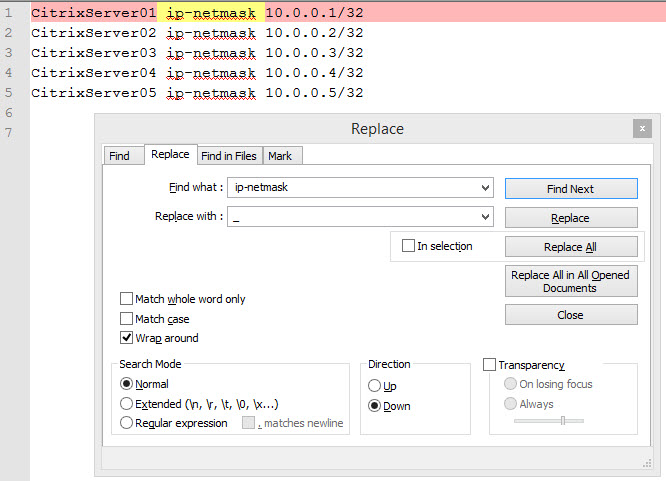
#Your file will now look like this:
#=============================================================
CitrixServer01_10.0.0.1/32
CitrixServer02_10.0.0.2/32
CitrixServer03_10.0.0.3/32
CitrixServer04_10.0.0.4/32
CitrixServer05_10.0.0.5/32
#=============================================================
#I Prefer to have the forward slash character replaced with an underscore so perform one final find and replace:
Find what: /
Replace with: _
Search Mode: Normal

#Your file will now look like this:
#=============================================================
CitrixServer01_10.0.0.1_32
CitrixServer02_10.0.0.2_32
CitrixServer03_10.0.0.3_32
CitrixServer04_10.0.0.4_32
CitrixServer05_10.0.0.5_32
#=============================================================
#Switch back to Microsoft Excel and add the following text to cell B1
to
#Now paste the newly renamed objects into cell C1. Then copy and paste the B1 to all of the remaining B cells to fill out your chart. Your chart should look like this:

...[tutorial continuing to next post]...
- Mark as New
- Subscribe to RSS Feed
- Permalink
06-03-2015 11:05 AM
#Now copy the excel spreadsheet and paste it back into Notepad++. Perform the following Find and Replace to remove the TABs that Excel uses to separate the fields:
Find what: \t
Replace with:
Search Mode: Extended
#Note the replace field is the space character, you can't see it in the text above.
#Now perform the following Find and Replace to change the command from a SET command to a REPLACE command:
Find what: set
Replace with: replace
Search Mode: Normal
#Your file will now look like this:
#=============================================================
rename device-group "Internet Firewall" address CitrixServer01 to CitrixServer01_10.0.0.1_32
rename device-group "Internet Firewall" address CitrixServer02 to CitrixServer02_10.0.0.2_32
rename device-group "Internet Firewall" address CitrixServer03 to CitrixServer03_10.0.0.3_32
rename device-group "Internet Firewall" address CitrixServer04 to CitrixServer04_10.0.0.4_32
rename device-group "Internet Firewall" address CitrixServer05 to CitrixServer05_10.0.0.5_32
#=============================================================
There are a lot of girations to go between Notepad++, Excel, Command Prompt so this process is really only meant for renaming many objects. Even with creating this procedure and performing the renames, I was able to create the script to rename just under 2,000 host objects in under two hours.
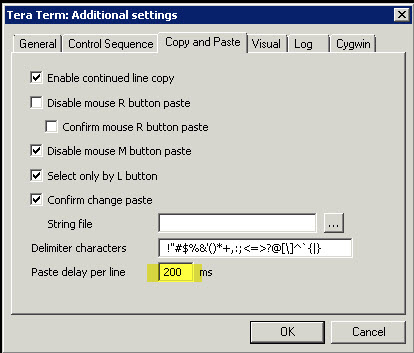
Pasting these commands into my Panorama appliance proved to be slightly problematic. I had to use TeraTermPro to use the "Paste Delay Per Line" feature. Pasting the entire script into Putty did not work well. Adding a 200ms delay between each line was perfect. I got decent speed and no issues with text smashing into the console before the previous line was processed.
TeraTerm >> SETUP >> ADDITIONAL SETTINGS>> COPY AND PASTE TAB:
- Mark as New
- Subscribe to RSS Feed
- Permalink
06-03-2015 03:35 PM
Instead of the 200ms between lines, have you tried enabling scripting mode?
admin@black_knight(active)> set cli scripting-mode
off off
on on
admin@black_knight(active)> set cli scripting-mode on
This has alleviated issues (for me) when pasting large amounts of config data into the firewall. From what I've been told, this will increase the input buffers and disable command completion. From here you can go into configure and paste your configuration changes/additions. I did this with about 4000 lines at a time during the last week and didn't have to add any delay between commands.
Once you've pasted the config & exited configuration mode, you can use "set cli scripting-mode off" to return the CLI behavior to its defaults... either that or logout/login. Don't forget to commit.
- 9290 Views
- 5 replies
- 0 Likes
Show your appreciation!
Click Accept as Solution to acknowledge that the answer to your question has been provided.
The button appears next to the replies on topics you’ve started. The member who gave the solution and all future visitors to this topic will appreciate it!
These simple actions take just seconds of your time, but go a long way in showing appreciation for community members and the LIVEcommunity as a whole!
The LIVEcommunity thanks you for your participation!
- Error: Duplicate address/external-ip-list name 'panw-known-ip-list' in Panorama Discussions
- API pagination for Panorama address object in General Topics
- Pull address object using XML API in General Topics
- Panorama PowerShell RESTAPI Error in Panorama Discussions
- Query: All vulnerabilities under 29 days in Cortex XDR Discussions


